Mostrando entradas con la etiqueta artemisablogs. Mostrar todas las entradas

octubre 02, 2011

ARTEMISA'S Firs Aniversary!!!


We are celebrating ARTEMISA'S BLOGS & WEB 1 first Anniversary!!!
  And to feast it we will have New Image, happier, fresh and much more fun .... we will have PROMOTIONS, GIVEAWAYS and more.... Wait For Them!!!


agosto 27, 2011

Who is ARTEMISA?

ARTEMISA  is ME!  Is my first name, not perfect for me, but perfect for my Design Business!!!

ARTEMISA Blogs & Web born in October 2010, with Blogs and Web Design concept, little by little with the public demand has grown and now offers Design:

1.- Blogs
2.- Web
3.- on-line e-commerce
4.- Business Identity
5.- Invitations & Announcement
6.- ETSY Packages
7.- Pre-mades Templates and Logos
8.- Networking Image
9.- Flash Gallery.... and more...

MEXICAN Pride!!! Artemisa Blogs & Web is growing at international level. With very good results and pretty excited to meet people from other countries that are not only customers but there has been a beautiful friendship. Thank you for trusting me, thank you for your comments and especially to know us.

It is my pleasure to serve you and make you happy with your projects.

A little history ... why not?

In Greek mythology, Artemisa is the daughter of Leto and of Zeus, ruler of all of the gods. She is also the twin sister of the god Apollo. Artemis is one of the most widely known and worshiped of the Gods. She is known to have been venerated in almost all of the Hellenic world. In Roman mythology, her name is Diana. In the Etruscan mythological tradition, she is Artume.

As with all of the gods and goddesses, certain symbols are sacred to Artemis. Both the deer and the cypress are sacred to Artemis. Perhaps it is because Artemis is considered to be the goddess of the hunt and the wild that these forest symbols are associated with her. By displacing the Titaness Selene, Artemis also became the goddess of the moon. In artwork, Artemis is almost always painted with her sacred images and symbols. In paintings, she is usually naked, in a forest scene with deer. She may be holding or wearing a bow and quiver of arrows.

Here in Mexico ARTEMISA is "Diana the Huntress" {La Diana Cazadora}. As Diana is the protagonist of most of the performing arts, is chosen for the most beautiful paintings, because it provides the big picture of nudes and nature as she appears in most cases surrounded by her nymphs, as if it were inseparable from them, composing an irresistible fresh feminine beauty.

ARTEMISA or Diana are strong women and beautiful in all aspects of artistic and creative inspiration! They are strong and unique! Like all designs and creations irresistibly magical and create for each client. Are unique, fresh, funny and original.

Here she is:

mayo 05, 2011

NEW Tutorial: How to create a favicon?

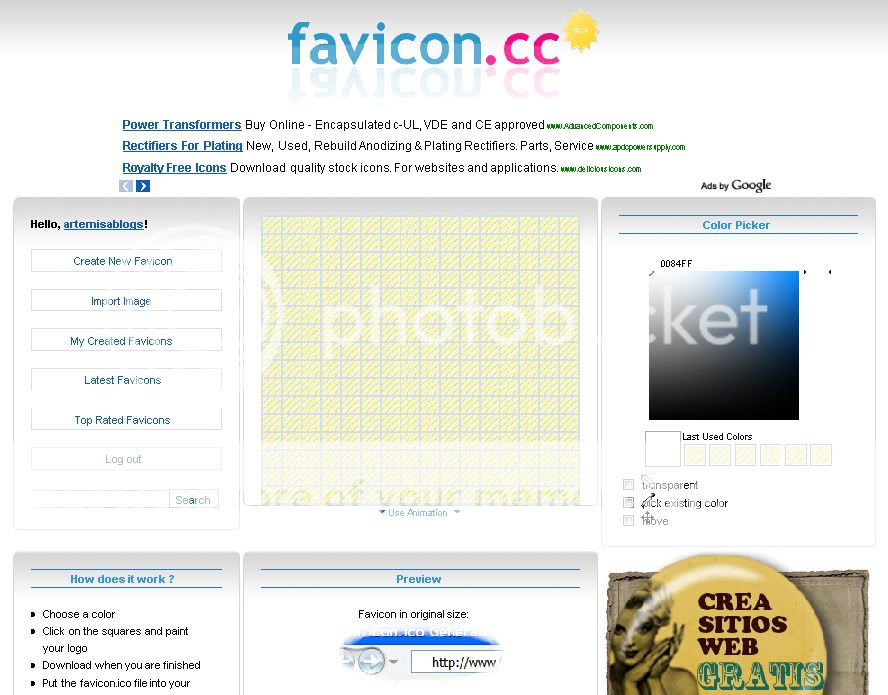
I now every blogger want to have their own favicon and an easy tutorial just doesn't exist, so I let You this NEW Tutorial: How to create a favicon. This is for firefox plataform.

Here the steps:

1.- Create your image/icon as a PNG or JPG {make sure that your background is transparent or white}


2.- Go to http://www.favicon.cc/ and get your account.


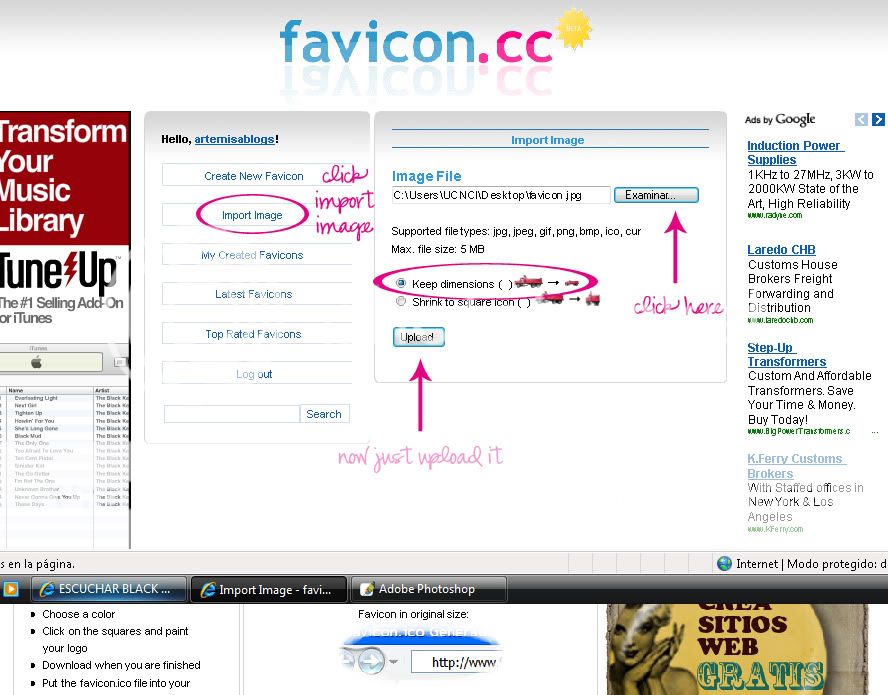
3.- Now log in and click "Import Image", upload your image, just make sure to pick "Keep dimensions".


4.- Scroll dawn and click "Publish under an open license" copy the code {the big one}


5.- now just paste the code in your "HTML template" look for " target and paste it above. Save ti and thats it!!!

I hope this help you guys...

abril 22, 2011

Pre-made Logo Design

Artemisa Blogs & Web specializes in Graphic Design for small business, photography and Companies. I have over 7 years of experience in professional graphic design, web design, advertising and business identity.

I work as quickly and efficiently as I can, but without diminishing the quality of every product delivered. Making sure that every customer is 100% satisfied and happy with what your final proyect.


Below you will find colorful, fun and saucebox logos for boutiques, photographers, small businesses and more!

All logos are edited to include your business name and color theme at no additional charge and they will be sold only once to make ensure that the logo design is unique as your business.

Here the Logos:

{$20 USD}


{$20 USD}


 {$20 USD}


{$30 USD}


{$30 USD}

{$30 USD}

{$30 USD}


{$45 USD}


{$45 USD}


{$45 USD}


{$45 USD}


{$75 USD}


{$75 USD}


{$75 USD}


{$75 USD}


{$75 USD}


Pre-made Logo Design


Your logo is suitable for web and print use and will be digitally sent to you in both

Why choose Artemisa Blogs & Web
*************************************************************

♥ Logo created by a professional Graphic Designer
♥ Business NAME and TEXT Colors Theme can be changed for no extra charge
♥ Quick turnaround: receive your files in 72 hrs or less

*************************************************************

***Ordering Information:***
When ordering, Please add:
♥ Business Name you'd like on the logo
♥ Color Theme you want on the logo

***Once payment and the above information is received you'll receive your logo via email within 72hrs or less.

♥File Formats:

1.- JPEG File Full Color Logo {300dpi}
2.- PNG File Full Color Logo {300dpi} Transparent background
3.- GIF File Full Color Logo {Monitor Resolution Files for Websites, Blog and e-mail use}


Custom Logo Design Details, formats, packages and more... here

abril 16, 2011

NEW TUTORIAL: Add LinkWithin Widget to Your Post!

Hey Guys & Dolls! Have you ever seen this after a Post:

The Steps:
1.- Go to the LinkWithin site
2.- Fill the form with your info:
3.- Click on "Instal Widget"
4.- Choose ONE BLOG {if you have more} and change de Title if you want
5.- Move the NEW WIDGET below the Post Area

6.- Now just SAVE and thats it!!!

abril 13, 2011

GIVEAWAY of the April Month

Hi everyone! I have a NEW GIVEAWAY!!! Yeah... Im offering 5 FREE Blog Button Design. This could be for You, a friend or family.

Here the steps:
1.- You most write a BLOG POST about "Artemisa Blogs & Web" in a comment on your Blog and Blog Frog Profile & Community {if you have one}
2.- Your blog(s) must have been established for 5 months or more and have at least 30 followers
3.- Post can be about my services, about "Artemisa Blogs & Web" in general, about blog designs, my freebies, tutorials, etc... as long as it links to artemisablogdesign.blogspot.com
4.- Add as a Follower in "Artemisa Blogs & Web"
5.- Click on "Me gusta" {I like it} in the facebook box
6.- Paste the URL of your BLOG POST about "Artemisa Blogs & Web" in a comment on the facebook page

***Do not include any Logo Design or ilustration from iStockphoto {you have to buy it by your self}

I will pick up to 5 WINNERS and I'll  post it on Friday April 29th at my Blog Frog Community and Artemisa Blogs & Web Site.

marzo 15, 2011

Flash Header Tutorial

Hey guys! I have a NEW FREE TUTORIAL {How to do a FLASH HEADER} this is for Blogger Plataform, but you can use it for any purpose, I hope you like it, so ENJOY it!!!


Here the steps:
1.- Make your Header Image using any design or photo editing program like "Photoshop, Paint or Photoshop Elements", Im using "Photoshop" so 2 important things:

  • Check your Header size, in my case {1000 x 308 px}
  • Live the photo área "Transparent" and save the Header as a PNG

2.- This is The Flash Environment to help you guy to find everything:


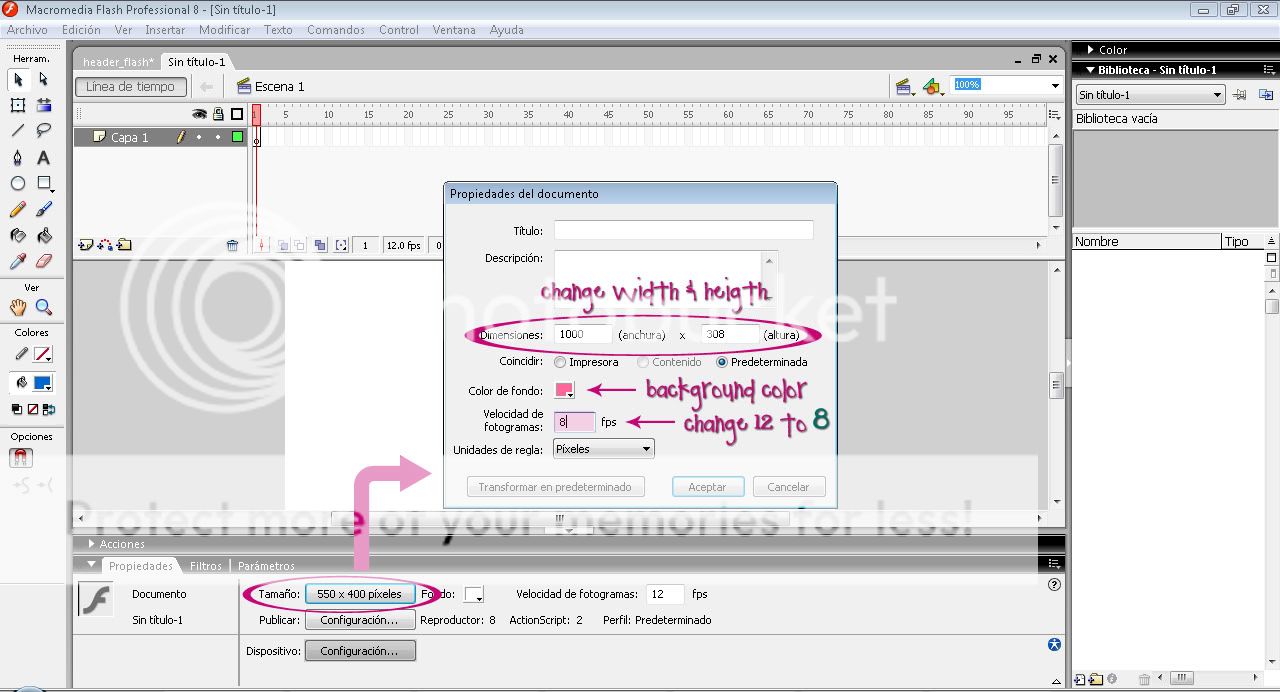
3.- Open Adobe Flash, then click the Size Button and put the width and height of your Header. Then change de Background Color if you want and change 12 to 8 FPS {frames per second} and click OK

**You can Press {Ctrl-2} to see your Stage complete on your screen

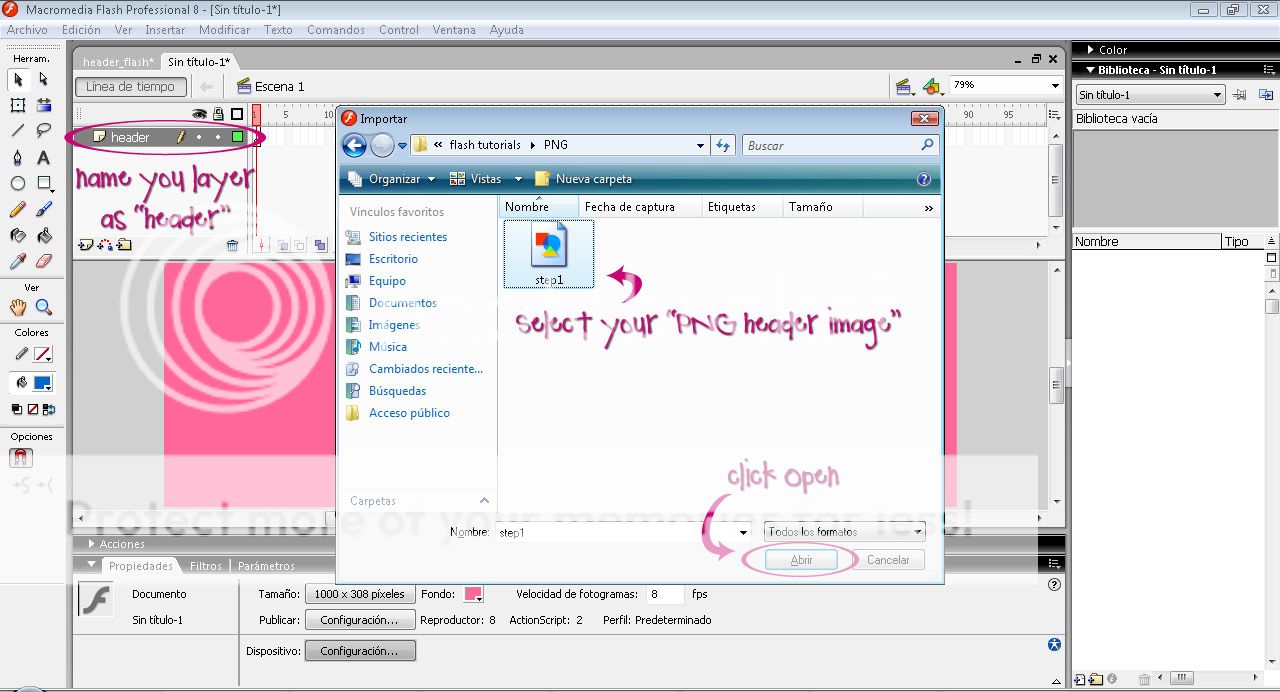
4.- Change your layer name to "Header" with double click {name your layers is important and helpful}, then press {Ctrl-R} to import you PNG Header Image and Click Open

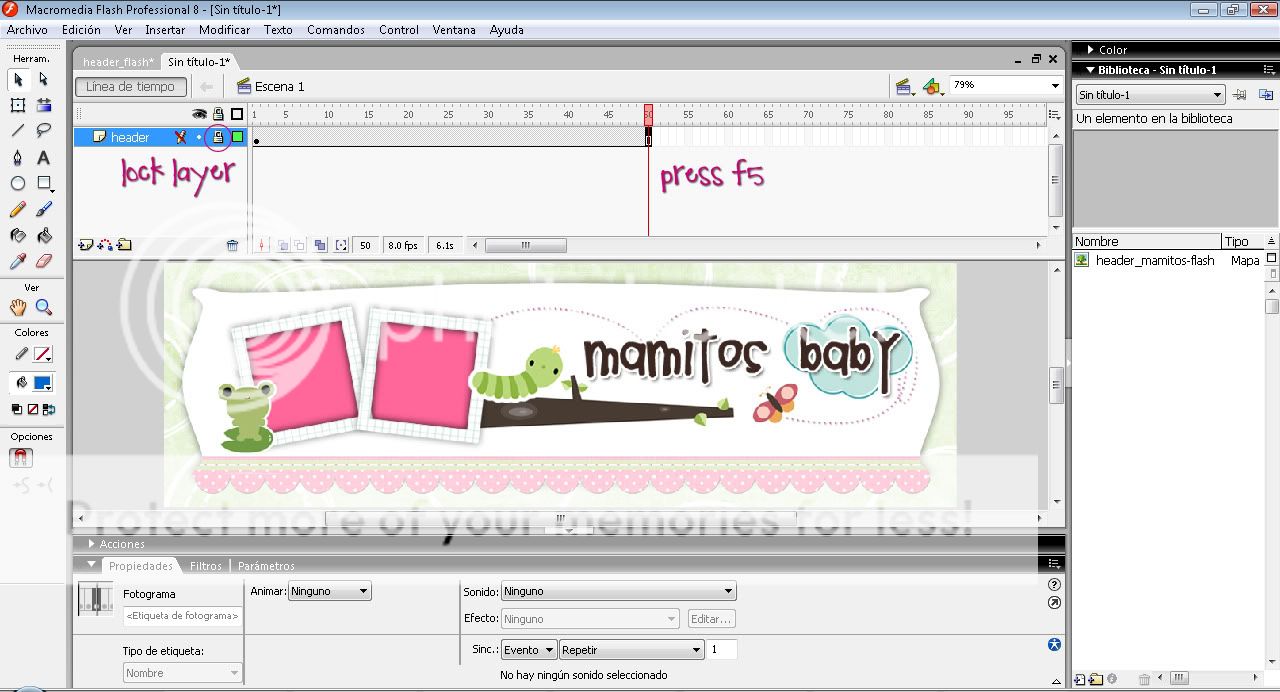
5.- You have to see your header image, click your 50th frame in the Timeline and insert a frame {F5} and lock your layer by activating the lock icon

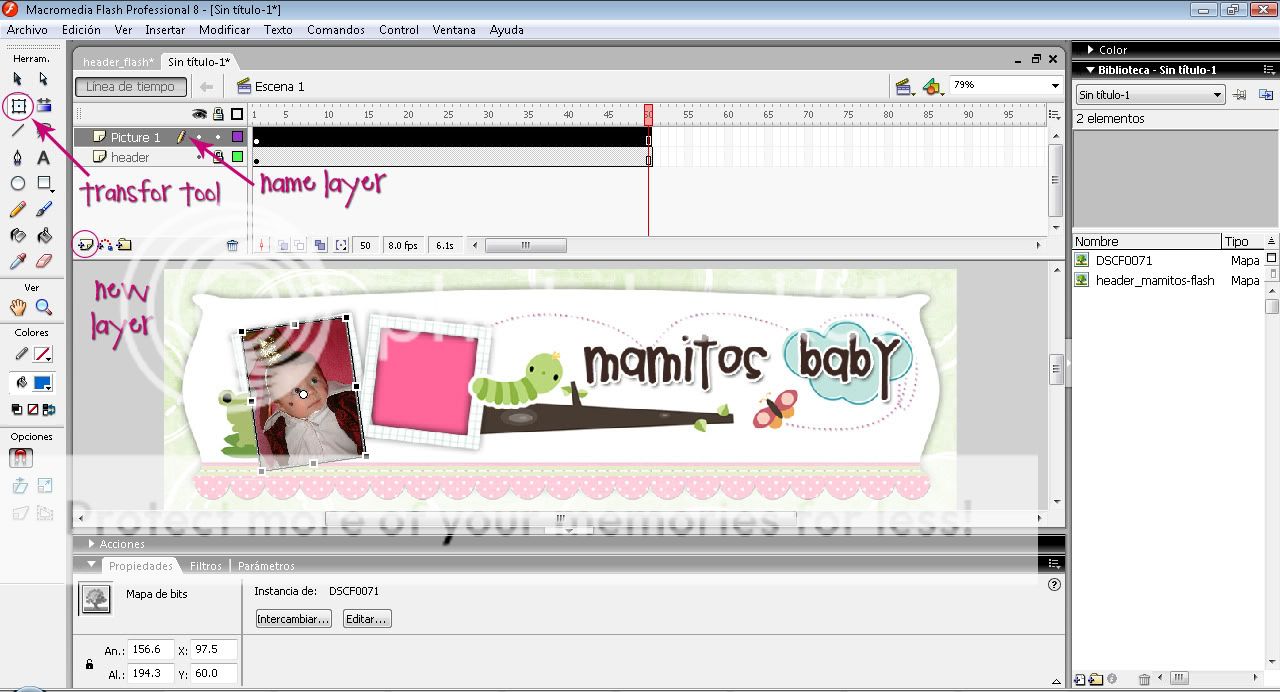
6.- Create a New Layer and name it "Picture 1", then press {Ctrl-R} and select your first picture, resize and rotate it by pressing {Q} or with "Free Transform tool" to fit your header photo area.
7.- Now select the black arrow tool and press {F8} to convert your picture in a Symbol or Modify Menu > Convert to Symbol, then Select the Movieclip Behavior and name the symbol, as 'Picture1' and click Ok.
8.- Double-click in the picture on the stage to switch to its symbol editing mode. Click on the 15th frame in the Timeline and insert a Key Frame {F6}. Now right-click the 14th frame in the Timeline and select Create Motion Tween (or Motion option from the Tween panel of the Properties inspector)

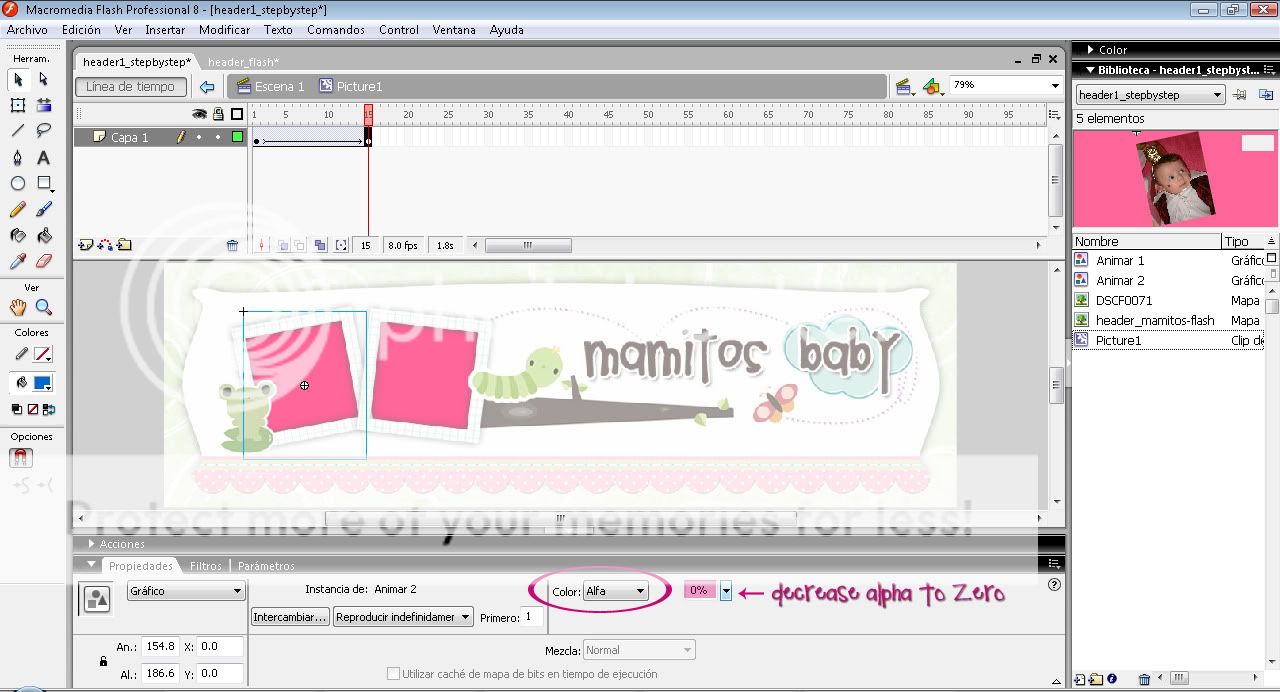
9.- Select the 15th frame and click the picture on the stage and in your Color option from the Properties Panel select "Alpha" and decrease it to "0%" and lock the Layer.
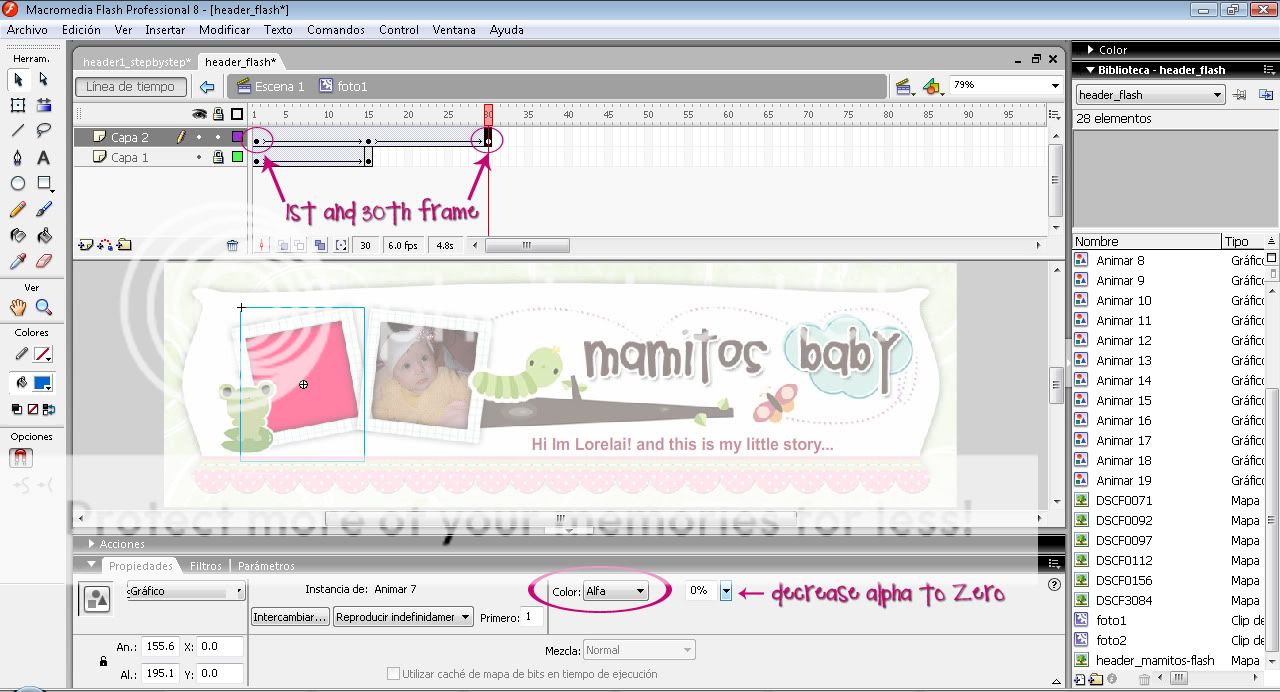
10.- Create a New Layer and import another picture {Ctrl-R}, resize and rotate it. Now Click on the 15th frame in the Timeline and insert a Key Frame {F6} and right-click the 14th frame in the Timeline and select Create Motion Tween. Click on the 30th frame in the Timeline and insert a Key Frame {F6}, Right-click the 29th frame in the Timeline and select Create Motion Tween. Click on the 1st frame and click your image on the stage and in your Color option from the Properties Panel select "Alpha" and decrease it to "0%". Repeat the alpha step in the 30th frame and lock the layer.

11.- Create a New Layer, click on the 15th frame in the Timeline and insert an empty frame {F7}, then import another picture {Ctrl-R}, resize and rotate it. Now Click on the 30th frame in the Timeline and insert a Key Frame {F6} and right-click the 29th frame in the Timeline and select Create Motion Tween. Click on the 45th frame in the Timeline and insert a Key Frame {F6}, Right-click the 44th frame in the Timeline and select Create Motion Tween. Click on the15th frame and click your image on the stage and in your Color option from the Properties Panel select "Alpha" and decrease it to "0%". Repeat the alpha step in the 45th frame and lock the layer.

12.- Create a New Layer, click on the 30th frame in the Timeline and insert an empty frame {F7} and unlock the 1st layer, click on the 1st frame in the Timeline and copy the image {Ctrl-C}. Go to the 30th frame on your 4th layer and press {Ctrl-shift-V} to paste it in the same place. Now Click on the 45th frame in the Timeline and insert a Key Frame {F6} and right-click the 44th frame in the Timeline and select Create Motion Tween. Click on the 30th frame and click your image on the stage and in your Color option from the Properties Panel select "Alpha" and decrease it to "0%". Lock the layer and back to Scene 1.
13.- Drag Picture 1 Layer down the Header Layer.

14.- Repeat steps 6 to 13 as many times as you want or need, just remember to name the layers. In my case I just need 2 Picture Layers.

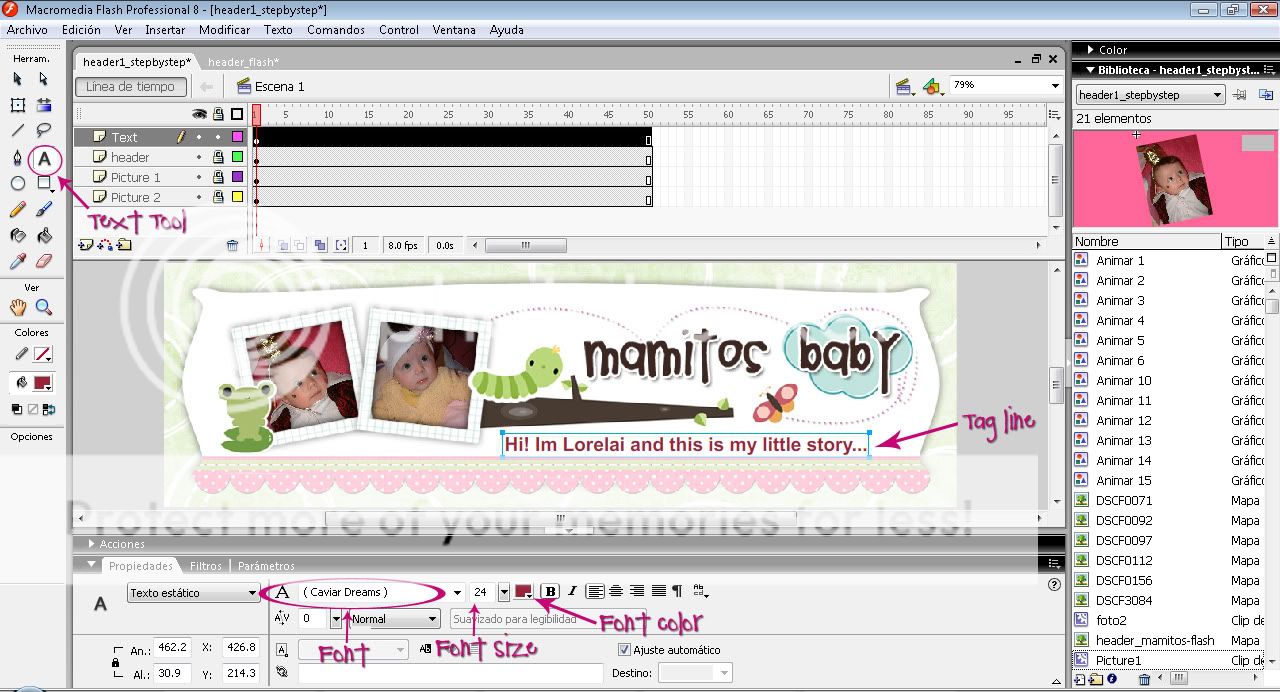
15.- Lets add some text or Tag line, Select the Header Layer, then Creat a New Layer and name it "Text". With your Text Tool Click on the stage and write your line, choose a cute font, add a great color and resize it as you need.

16.- Click on the 15th frame in the Timeline and insert a Key Frame {F6}. Now right-click the 14th frame in the Timeline and select Create Motion Tween. Repeat the same in the 30th and 50th frames. Clik the 1st frame and with the black arrow move the text to the right out of the stage.

17.- Click on the30th frame and click your image on the stage and in your Color option from the Properties Panel select "Tint" and select a color and increase it to "100%".

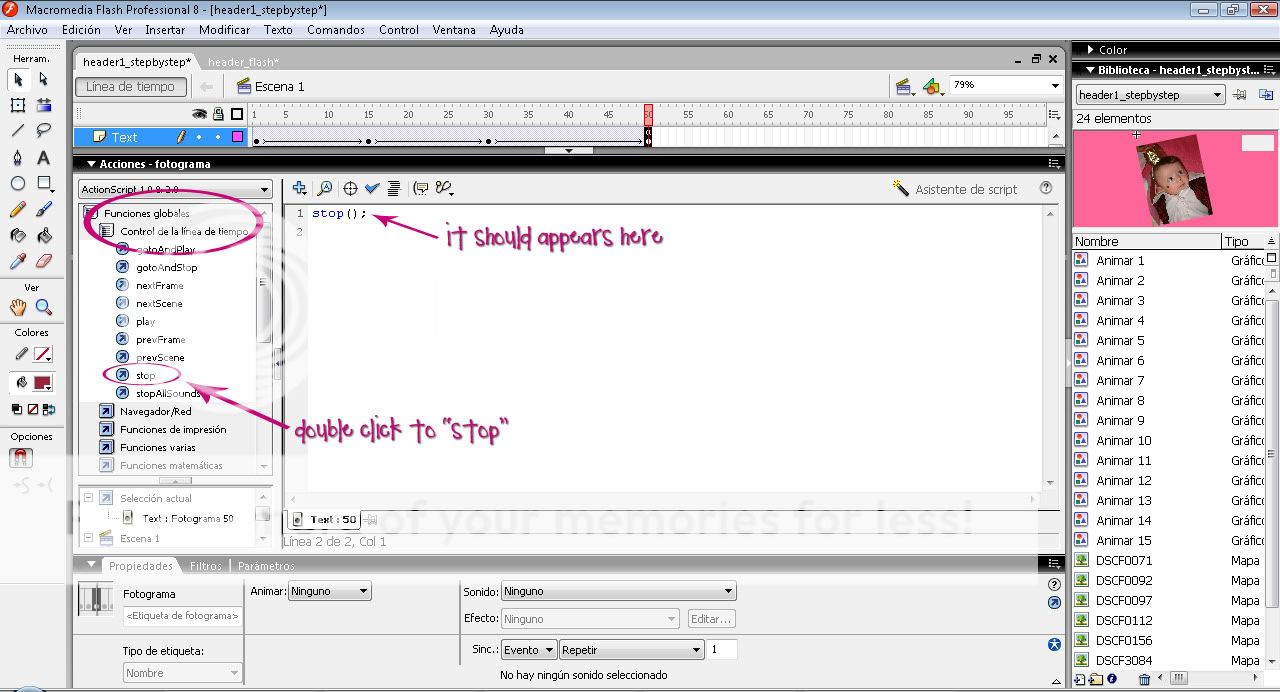
18.- The final step, Click on the 50th frame and Press {F9}, then in the Action Panels click the "Global Functions" and select "Timeline Control". Double-click to Stop. Press {F9}.

19.- Congratulations!!! Is Done just save yor file {Ctrl-S}. Now you have 2 files save it ".fla" (red icon) is your editing file and ".swf" (gray icon) is your movie wich you'll upload to photobucket account to add it to your Blog.

 
Blog Design by Artemisa Blogs and Web